There are two types of onion rings in this world.
- The Sad Kind: Thin, oily, soggy, and when you take a bite, the entire hot onion slides out like a worm, slapping you on the chin and leaving you holding a hollow tube of fried batter.
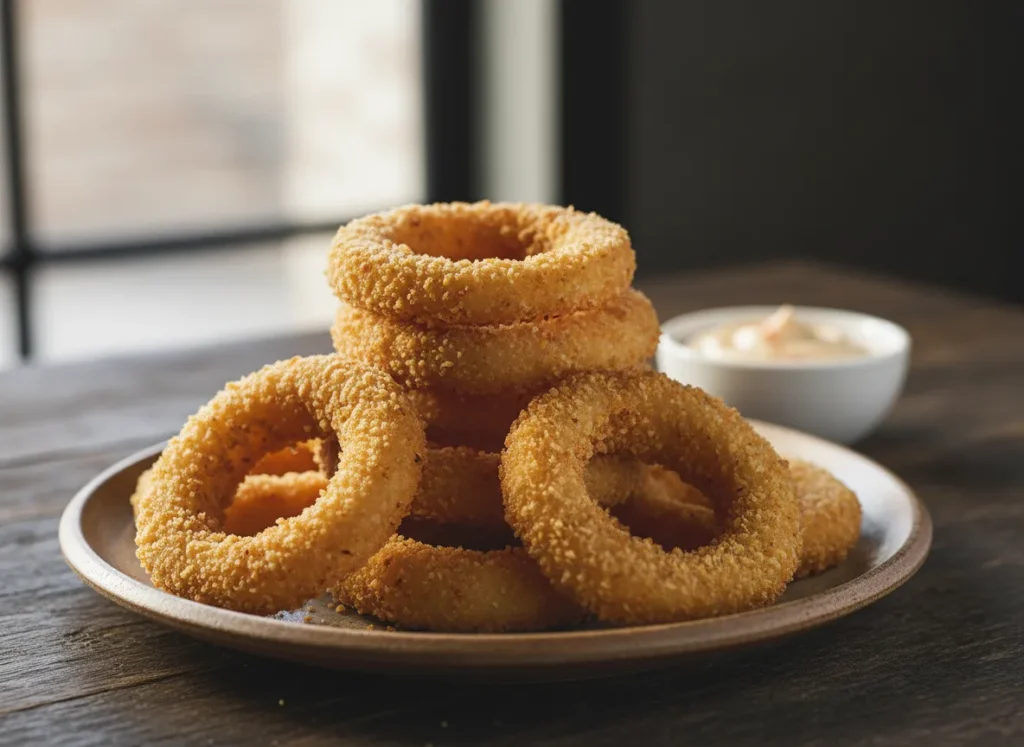
- The “Crispy Basket” Kind: Thick, sweet onion slices encased in a sturdy, shatteringly crunchy shell that breaks cleanly with every bite.
Most homemade air fryer recipes result in Type #1. The batter drips off, the onions steam, and it’s a mess.
Welcome back to The Crispy Basket. Today, we are engineering the perfect Onion Ring.
We are ditching the wet beer batter (which doesn’t work well in air fryers) and using a “Standard Breading Procedure” reinforced with Panko and a quick freezer hack. This guarantees a crunch that rivals any steakhouse or drive-thru.
Why You’ll Love This Recipe
- The Crunch is Audible: Panko breadcrumbs are the MVP here. They stay crispy even after dipping in sauce.
- No “Sliding Onion”: By cutting the onions thick and using flour as a primer, the coating adheres tightly to the vegetable.
- Less Guilt: Deep-fried onion rings are sponges for oil. These achieve the same texture with just a tablespoon of cooking spray.
“The Crispy Basket” Secret: The Flour Primer & The Chill
Onions are slippery. Batter hates slippery surfaces.
Secret 1: The Flour Primer. Before any egg or crumb touches the onion, it must be tossed in seasoned flour. This dries out the surface moisture and gives the egg wash something to grab onto.
Secret 2: The Chill. Once breaded, we stick the rings in the freezer for 10–15 minutes while the air fryer preheats. This sets the breading so it doesn’t blow off when the powerful air fryer fan kicks on.
Ingredients Needed
The Veg:
- 2 Large Sweet Onions: (Vidalia or Walla Walla are best). Sweet onions caramelize beautifully inside the crust. White onions work too, but have a sharper bite.
The Station:
- 1/2 cup All-Purpose Flour: Plus 1 tsp paprika, 1 tsp salt, 1/2 tsp pepper.
- 2 Large Eggs: Beaten with 2 Tbsp buttermilk (or regular milk). The buttermilk adds a nice tang.
- 2 cups Panko Breadcrumbs: Mixed with 1 tsp garlic powder and 1 tsp dried parsley.
- Cooking Spray: Essential for browning.
Step-by-Step Instructions
Step 1: Slice the Onions
Peel the onions and cut them into thick slices—about 1/2 inch to 3/4 inch thick. Separate the rings gently. Save the tiny inner rings for salads or omelets; we only want the big outer rings for this recipe.
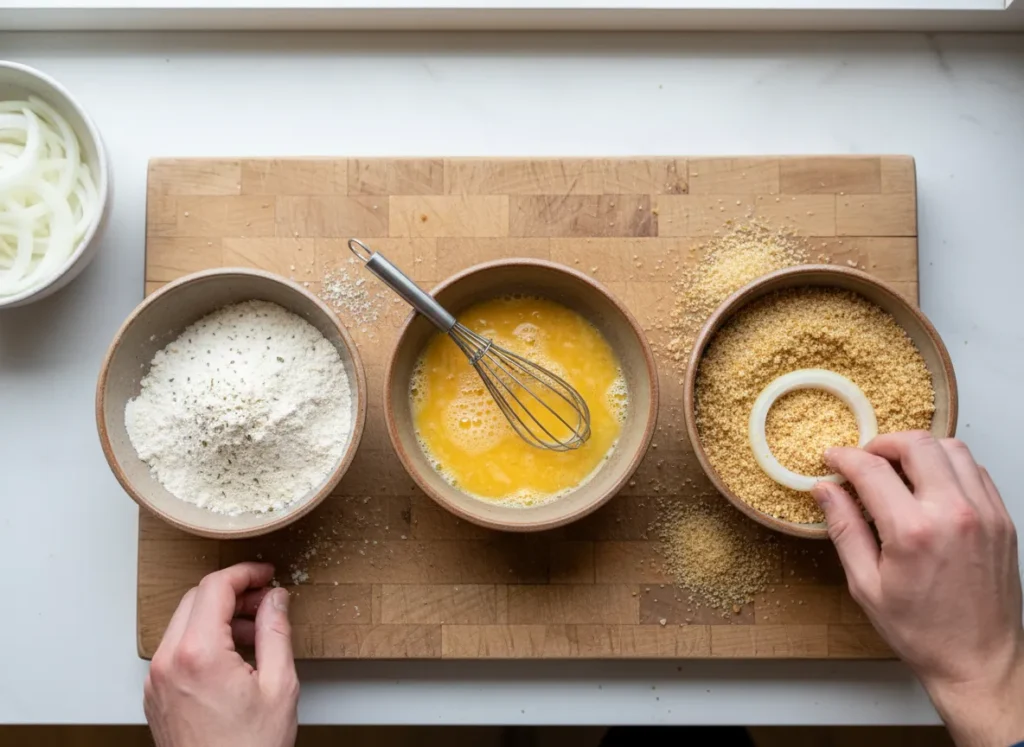
Step 2: Set Up the Station
Line up three bowls:
- Bowl 1: Seasoned Flour.
- Bowl 2: Egg/Buttermilk wash.
- Bowl 3: Seasoned Panko.
Step 3: The Dredge (Keep One Hand Dry!)
- Toss a few rings in the flour (Bowl 1). Shake off the excess. They should look dusty, not caked.
- Dip into the egg wash (Bowl 2). Let excess drip off.
- Press firmly into the Panko (Bowl 3). Use your hand to shovel crumbs over the top and press them into the inside of the ring too.
- Place on a baking sheet. Repeat until all rings are coated.
Step 4: The Chill
Place the baking sheet of breaded rings in the freezer for 10–15 minutes. This solidifies the coating and prevents it from sticking to the basket mesh.
Step 5: The Air Fry
- Preheat your air fryer to 375°F (190°C) for 5 minutes.
- Spray the basket floor with oil.
- Arrange the semi-frozen rings in a single layer. Do not overlap. Cook in batches (usually 2 batches for 2 onions).
- Spray Generously: Spray the tops and sides of the rings liberally with cooking spray. You want to see the Panko glisten.
- Air fry at 375°F for 10–12 minutes.
- Flip halfway through and spray any dry spots. They are done when they are deep golden brown and feel hard to the touch.
-1766717866017")
Step 6: Serve
Serve immediately! Onion rings wait for no one. Serve with Zesty Sauce (mayo, ketchup, horseradish, and Cajun spice).
“The Crispy Basket” Pro-Tips
- Remove the Membrane: Sometimes onions have a thin, papery membrane between layers. If you see it peeling off, pull it off before breading. That membrane is often the culprit for the “sliding onion” phenomenon.
- Don’t Use Wet Batter: Recipes that call for a liquid beer batter (like tempura) usually fail in an air fryer because the batter drips through the holes before it cooks. Stick to the flour-egg-Panko method for success.
- Reheating: These reheat surprisingly well. 3 minutes at 400°F brings the crunch right back.
FAQ
Why is my flour falling off? You probably didn’t shake off the excess flour in Step 1, or you didn’t press the Panko on hard enough. Be aggressive with the breadcrumbs!
Can I make these gluten-free? Yes! Use GF flour in Bowl 1 and GF Panko crumbs in Bowl 3. The texture is almost identical.
Enjoy the crunchiest side dish ever!